
Previously, we wrote about a fix we made on our ice chest. We’ll call this update “Coleman Cooler Hinges 2.”
 For many months after replacing a broken plastic hinge that came on one of our Coleman ice chests, we had great success with it.
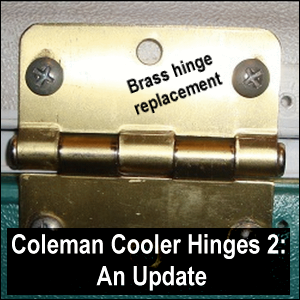
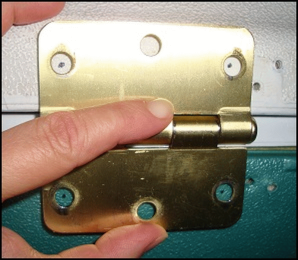
The photo here shows the way the replacement hinge looked when it was newly installed (“Brass hinge replacement” written over the hinge).
But over time, the screws that were mounted into the body of the ice chest started to come out.

Vicki temporarily fixed that by:
- removing the screws,
- placing a piece of Gorilla Tape (the sturdiest tape we have ever used) under the bottom part of the hinge,
- reapplying the screws, and
- then putting another longer piece of Gorilla Tape on top of it to try to keep the hinge and screws in place.
Well, that set-up lasted for only so long.
Coleman Cooler Hinges 2: Before the Repair

This is the way the hinge looked after some pretty regular use.
Notice that the top piece of Gorilla Tape had come loose and the screws had come out.
What was worse was that when the screws came out of the replacement hinge (meaning that the lid was no longer “connected” to the body of the cooler), every time we opened that cooler, more stress was put on the remaining plastic hinge.
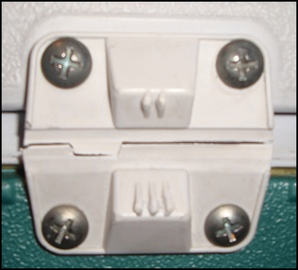 Eventually, the plastic hinge could no longer handle that stress and cracked in two.
This is the second plastic Coleman cooler hinge to crack on this particular ice chest.
Coleman Cooler Hinges 2: An Idea?
Vicki had had an idea of filling the screw holes with a type of Loctite or other sturdy filler and then using the same holes for reinstalling the hinge.
But she didn’t do that.
After the cooler got in this bad condition, she decided to move the hinge over.
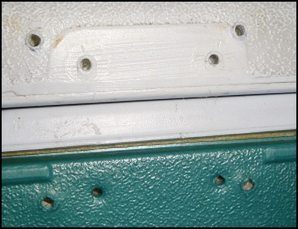 This photo shows the cleaned area where the first hinge had been replaced.
Notice the original four holes and the four additional holes for the replacement hinge.
Let’s get a little closer look at something…
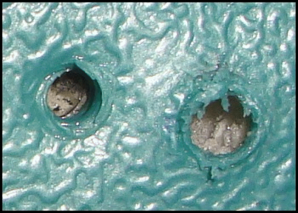 This is a close-up of two of the holes in the body of the cooler.
The one on the left is an original hole, the one of the right for the replacement hinge.
Contrast the sizes and edges of the holes. The replacement hole looks larger and like its been stripped.
Coleman Cooler Hinges 2: The Second Installation
Vicki held the replacement hinge where she wanted it to go and marked the places where she wanted to place the screws.
It must be noted that when we bought the second replacement hinge, we could not buy it by itself but had to buy it in a package with screws that we did not use on this cooler.
 The first replacement hinge, after having been cleaned of Gorilla tape residue, is reinstalled on the ice chest to the left of its previous location.
Coleman Cooler Hinges 2: Both Replacements
![]()
This photo shows replacements for both Coleman cooler hinges on this ice chest.
As a note of praise for Coleman as a manufacturer, they have begun to make hinged coolers with much sturdier hinges, like the one shown in this link from Amazon.com, with whom we have an affiliate relationship.
We purchased the cooler or ice chest shown immediately above and the hinge is quite sturdy.
We’ll plan to cover that on another page.
We also made another update beyond this one.
![]() Money saving tip: Again, buying replacement plastic hinges that could crack like the first ones did is not a good investment (for they will only break again).
Money saving tip: Again, buying replacement plastic hinges that could crack like the first ones did is not a good investment (for they will only break again).
We got a lot of mileage out of the brass hinge.
This page shows that it was not the brass hinge that failed but the surface onto which the brass hinge was installed.
We anticipate that months down the road, we may have the same problem that is described on this page, where the body of the cooler will give way again and the screws holding the hinges in place will come loose.
We are open to learning how to make the body of the ice chest grip the screws better.
What kind of reinforcement would work well but not destroy the integrity of the cooler itself?
Mike points out that when we bought the cooler featured on this page, it cost about US$50.
Just because a hinge breaks doesn’t mean that it doesn’t keep food cold any more.
While we chose to replace the hinges on this ice chest, the lid will work well without any hinges at all!
It is more convenient for us to use the cooler with a hinged lid.
That’s why a total replacement cost for both hinges at less than $4 was a good investment for us. Perhaps it can be for you, too.
Until this ice chest loses its insulating ability or cracks beyond repair, we plan to continue using it.
Return from Coleman Cooler Hinges 2: An Update to our Meal Preparation page or our Truck Drivers Money Saving Tips home page.